In this article, we will explain the process to customize your campaign so that it can be viewed in more than one language. For grandfathered/legacy plans, you will need to be on a Power subscription to add custom JavaScript. Additionally, you will need a good understanding of HTML, CSS, and JavaScript to perform this customization.
You will need a few assets to start:
1: You will need all images in your campaign to be created twice, one for each language. This includes: Entry page, Post entry page, language toggle buttons, gallery page (optional).
2: You will need to host all images online using a site like: Tinypic.com or https://ctrlq.org/images/
3: You will want translations for all copy added into the campaign.
To begin you will first need to create a Campaign type of your choice followed by completing the first page of basic information about your promotion. Next, go to the Design section (in Classic Campaign Templates) or the Builder section (in new AI Sites) where we can begin the customization process. First, you will want to add in all of the coding needed as shown below.
Note: all of this coding is used in the Custom JavaScript and Custom CSS sections of the Design page and not directly in the elements (Builder > coding tabs in AI Sites). These classes might change if you are looking to title them for different languages. For example, you can change .spanish to .french but just know you will need to make that change throughout all other pieces of coding shown below.
Code
CSS to add:
.english, .spanish {
display:none;
}
.english.active, .spanish.active{
display:block;
}
span.english.active, span.spanish.active{
display:inline;
}
CSS Explained: First, is the display: none; for the classes that are used for your language. This makes it so that only the active classes will display in connection to the Javascript. The other two pieces of coding are to help align those classes for seamless transitions.
JavaScript to add:
$(document).ready( function() {
setLanguage();
$(‘.activate_spanish’).click(function() {
localStorage.setItem(‘language’, ‘spanish’);
//lang options
setLanguage();
});
$(‘.activate_english’).click(function() {
localStorage.setItem(‘language’, ‘english’);
setLanguage();
//lang options
});
});
function setLanguage () {
if (localStorage.getItem(‘language’) == ‘spanish’) {
$(‘.english’).removeClass(‘active’);
$(‘.spanish’).addClass(‘active’);
} else {
$(‘.spanish’).removeClass(‘active’);
$(‘.english’).addClass(‘active’);
}
}
Javascript explained
With this Javascript, we setting up a couple important features for the language changing. The upper half of the coding is for the setting of the language to one language or the others based on those “activate” classes that are applied to your toggle buttons. Additionally, local storage is added so then as the user completes the entry page the post entry page will also remain in that language.
The second half of the coding is for the adding and removing of images based on their class. So as the English language is set all images and text with the class of “English” will display were as all “Spanish” classes will become hidden. As well as vice versa.
Setting up the campaign with HTML
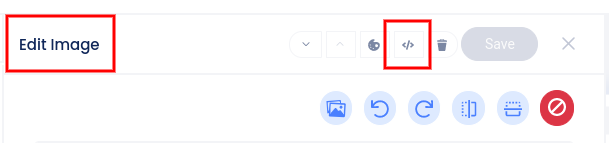
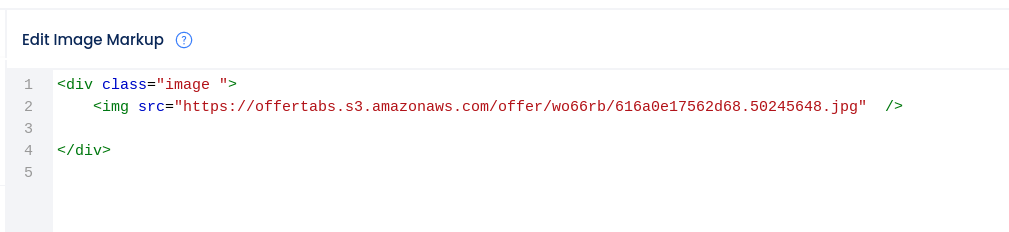
Now that all of the back-end coding is added, we will need to add the HTML to the front end. You will first want to add an Image element and directly upload your image. From there you will need to click on the image, then click the Code (</>) icon to open the HTML editor for that element. Now duplicate the image coding and then change out the image URL in the section element. From there you will want to apply the appropriate classes for each.
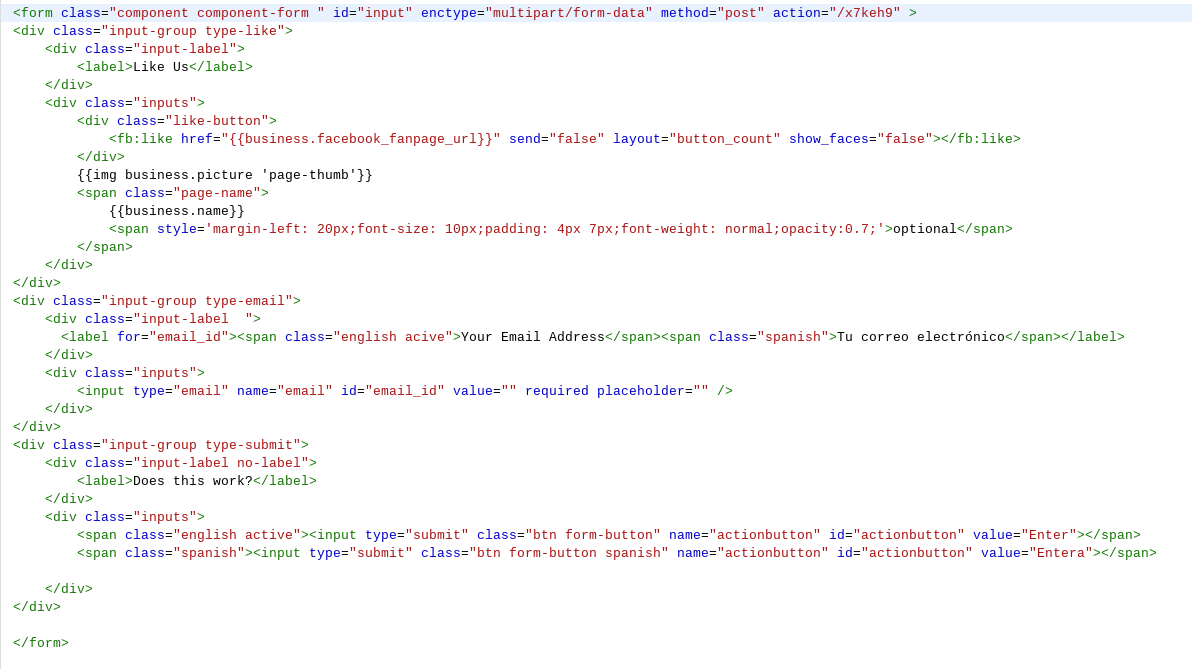
Form translating
With the form, we are going to toggle the language of the form by placing spans within each label for the two languages. You will add the class for that language as well as the active class for the language you would like to display by default.
Language menu bar
For a language menu bar, you will need to add an HTML element. With this, you should be able to change all of the languages and images within your contest for your promotion.

